将Scaleway打造成aria2下载机,自动上传云网盘。
开始前 先拥有Scaleway每月0.38欧元的服务器。 ///申请教程很多点击查看。
一、使用可以连接ipv6的网络,进行ssh连接。(宽带支持ipv6或手机4g,5g网络)
1) cloudflare的warp脚本。
=====================
CFwarp
可以让纯ipv6机器访问ipv4站点。
wget -N https://raw.githubusercontents.com/kkkyg/CFwarp/main/CFwarp.sh && bash CFwarp.sh运行后敲 1 回车就行
就有ipv4访问了

2) 将ipv6地址放在cloudflare进行代理使用。
=============================
把你的域名放到cf托管。
进行AAAA解析。

3) 下载宝塔7.7进行安装
==============
记住面板入口和账号密码
安装完成后修改后台端口为8080 (cf可用端口见 图)
浏览器访问输入 域名:8080/面板入口
输入帐号密码进入后台
进入后 我这里只安装nginx就可以 (如果你需要其他的可以自行安装)
4) 部署alist
==========
一键安装脚本
curl -fsSL "https://nn.ci/alist.sh" | bash -s install
也可以使用docker进行安装 ,具体方法请参考[官网][3]
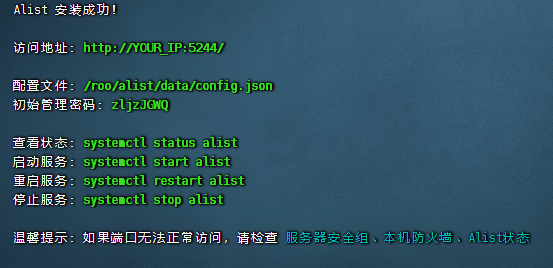
安装成功如下图

记住密码
此时 nginx 应该还需要一段时间。先去做点别的
5) 安装rclone fuse 挂载硬盘
=====================
我这里用的 onedrive 其他请参考官网材料
挂载作用是 aria2下载的文件 上传同步到云盘
1.安装rclone
官方提供的脚本
curl https://rclone.org/install.sh | sudo bash
安装完后,输入 rclone config 命令进入交互式配置选项,按照提示一步一步来进行操作即可。如果你一脸懵逼,可以去看[《Rclone 安装配置教程》][4]来了解配置的详细过程。
2.安装 fuse
# Debian/Ubantu
apt-get update && apt-get install -y fuse
# CentOS
yum install -y fuse
3.配置rclone config
参考[https://p3terx.com/archives/offline-download-of-onedrive-gdrive.html][5]
4.挂载网盘
挂载网盘分为手动挂载和开机自动挂载,根据自己的需求来选择。
手动挂载
#挂载
rclone mount <网盘名称:网盘路径> <本地路径> [参数] --daemon
#取消挂载
fusermount -qzu <本地路径>
网盘名称为配置时填的 name,网盘路径为网盘里的文件夹,留空为整个网盘,本地路径为 VPS 上的本地文件夹。参数可以查看官方文档根据需求进行选择。实际输入时不要有括号,这里只是为了更清楚的区分。--daemon 为进程守护参数,可后台运行。
使用示例
输入命令进行挂载操作:
rclone mount Onedrive:/ /Onedrive --copy-links --allow-other --allow-non-empty --umask 000 --daemon
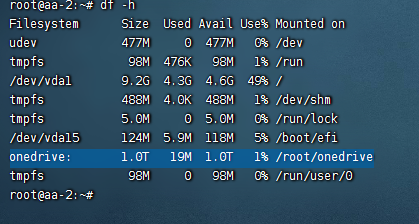
然后输入 df -h 命令查看挂载情况。

5.接着挂载Scaleway的免费75G当本地硬盘。(免费不知道现在还免费不,可以不挂载)
根据自己的服务器地区创建
要求:
- 您有一个帐户并已登录到Scaleway 控制台
- 您已配置 SSH 密钥
- 您已生成 API 密钥
那么先去生成api密钥:[https://console.scaleway.com/project/credentials][6]
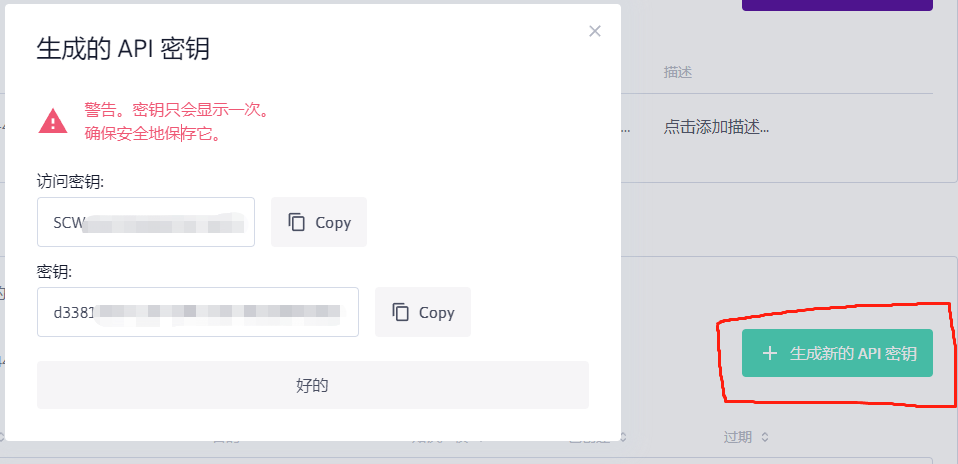
访问网站,登陆后新建API密钥
记住两串密钥

ssh里输入rclone config 点击查看具体配置
进行配置
[collapse status="false" title="rclone config"]
rclone经常更新这里的选项,请查看清楚具体选项再进行配置
1.选择新建 n
e) Edit existing remote
n) New remote
d) Delete remote
r) Rename remote
c) Copy remote
s) Set configuration password
q) Quit config
e/n/d/r/c/s/q>
2.输入名字
e/n/d/r/c/s/q> n
name> Scaleway #自己修改
3.输入 4 或者 s3
Type of storage to configure.
Enter a string value. Press Enter for the default ("").
Choose a number from below, or type in your own value.
1 / 1Fichier
\ "fichier"
2 / Alias for an existing remote
\ "alias"
3 / Amazon Drive
\ "amazon cloud drive"
4 / Amazon S3 Compliant Storage Providers including AWS, Alibaba, Ceph, Digital Ocean, Dreamhost, IBM COS, Minio, SeaweedFS, and Tencent COS
\ "s3"
5 / Backblaze B2
\ "b2"
6 / Better checksums for other remotes
\ "hasher"
7 / Box
\ "box"
8 / Cache a remote
\ "cache"
9 / Citrix Sharefile
\ "sharefile"
10 / Compress a remote
\ "compress"
11 / Dropbox
\ "dropbox"
12 / Encrypt/Decrypt a remote
\ "crypt"
13 / Enterprise File Fabric
\ "filefabric"
14 / FTP Connection
\ "ftp"
15 / Google Cloud Storage (this is not Google Drive)
\ "google cloud storage"
16 / Google Drive
\ "drive"
17 / Google Photos
\ "google photos"
18 / Hadoop distributed file system
\ "hdfs"
19 / Hubic
\ "hubic"
20 / In memory object storage system.
\ "memory"
21 / Jottacloud
\ "jottacloud"
22 / Koofr
\ "koofr"
23 / Local Disk
\ "local"
24 / Mail.ru Cloud
\ "mailru"
25 / Mega
\ "mega"
26 / Microsoft Azure Blob Storage
\ "azureblob"
27 / Microsoft OneDrive
\ "onedrive"
28 / OpenDrive
\ "opendrive"
29 / OpenStack Swift (Rackspace Cloud Files, Memset Memstore, OVH)
\ "swift"
30 / Pcloud
\ "pcloud"
31 / Put.io
\ "putio"
32 / QingCloud Object Storage
\ "qingstor"
33 / SSH/SFTP Connection
\ "sftp"
34 / Sia Decentralized Cloud
\ "sia"
35 / Sugarsync
\ "sugarsync"
36 / Tardigrade Decentralized Cloud Storage
\ "tardigrade"
37 / Transparently chunk/split large files
\ "chunker"
38 / Union merges the contents of several upstream fs
\ "union"
39 / Uptobox
\ "uptobox"
40 / Webdav
\ "webdav"
41 / Yandex Disk
\ "yandex"
42 / Zoho
\ "zoho"
43 / http Connection
\ "http"
44 / premiumize.me
\ "premiumizeme"
45 / seafile
\ "seafile"
Storage> 4
4.选择类型 这里选择scaleway选项
Choose your S3 provider.
Enter a string value. Press Enter for the default ("").
Choose a number from below, or type in your own value.
1 / Amazon Web Services (AWS) S3
\ "AWS"
2 / Alibaba Cloud Object Storage System (OSS) formerly Aliyun
\ "Alibaba"
3 / Ceph Object Storage
\ "Ceph"
4 / Digital Ocean Spaces
\ "DigitalOcean"
5 / Dreamhost DreamObjects
\ "Dreamhost"
6 / IBM COS S3
\ "IBMCOS"
7 / Minio Object Storage
\ "Minio"
8 / Netease Object Storage (NOS)
\ "Netease"
9 / Scaleway Object Storage
\ "Scaleway"
10 / SeaweedFS S3
\ "SeaweedFS"
11 / StackPath Object Storage
\ "StackPath"
12 / Tencent Cloud Object Storage (COS)
\ "TencentCOS"
13 / Wasabi Object Storage
\ "Wasabi"
14 / Any other S3 compatible provider
\ "Other"
provider> 9
5.输入9或scaleway 并回车后出现。选择1
Get AWS credentials from runtime (environment variables or EC2/ECS meta data if no env vars).
Only applies if access_key_id and secret_access_key is blank.
Enter a boolean value (true or false). Press Enter for the default ("false").
Choose a number from below, or type in your own value
1 / Enter AWS credentials in the next step
\ "false"
2 / Get AWS credentials from the environment (env vars or IAM)
\ "true"
env_auth>
6.输入1后回车,输入访问密钥,和api密钥
Option access_key_id.
AWS Access Key ID.
Leave blank for anonymous access or runtime credentials.
Enter a string value. Press Enter for the default ("").
access_key_id> SCWAGPV9Exxxxxxxxx
Option secret_access_key.
AWS Secret Access Key (password).
Leave blank for anonymous access or runtime credentials.
Enter a string value. Press Enter for the default ("").
secret_access_key> d33xxxb-xxx0-4xxxx-ace6-4xxxxxxxxxb5
7.输入您选择的区域,然后按 Enter。这里我们选择存储对应的地区 我这里是nl-ams,荷兰。
Enter a string value. Press Enter for the default ("").
Choose a number from below, or type in your own value.
1 / Amsterdam, The Netherlands
\ "nl-ams"
2 / Paris, France
\ "fr-par"
region> 1
8.接着选择s3.nl-ams.scw.cloud
Endpoint for Scaleway Object Storage.
Enter a string value. Press Enter for the default ("").
Choose a number from below, or type in your own value.
1 / Amsterdam Endpoint
\ "s3.nl-ams.scw.cloud"
2 / Paris Endpoint
\ "s3.fr-par.scw.cloud"
endpoint> 1
9.选择acl 这里选择1
Option acl.
Canned ACL used when creating buckets and storing or copying objects.
This ACL is used for creating objects and if bucket_acl isn't set, for creating buckets too.
For more info visit https://docs.aws.amazon.com/AmazonS3/latest/dev/acl-overview.html#canned-acl
Note that this ACL is applied when server-side copying objects as S3
doesn't copy the ACL from the source but rather writes a fresh one.
Enter a string value. Press Enter for the default ("").
Choose a number from below, or type in your own value.
/ Owner gets FULL_CONTROL.
1 | No one else has access rights (default).
\ "private"
/ Owner gets FULL_CONTROL.
2 | The AllUsers group gets READ access.
\ "public-read"
/ Owner gets FULL_CONTROL.
3 | The AllUsers group gets READ and WRITE access.
| Granting this on a bucket is generally not recommended.
\ "public-read-write"
/ Owner gets FULL_CONTROL.
4 | The AuthenticatedUsers group gets READ access.
\ "authenticated-read"
/ Object owner gets FULL_CONTROL.
5 | Bucket owner gets READ access.
| If you specify this canned ACL when creating a bucket, Amazon S3 ignores it.
\ "bucket-owner-read"
/ Both the object owner and the bucket owner get FULL_CONTROL over the object.
6 | If you specify this canned ACL when creating a bucket, Amazon S3 ignores it.
\ "bucket-owner-full-control"
acl> 1
10.选标准存储 2
Option storage_class.
The storage class to use when storing new objects in S3.
Enter a string value. Press Enter for the default ("").
Choose a number from below, or type in your own value.
1 / Default.
\ ""
/ The Standard class for any upload.
2 | Suitable for on-demand content like streaming or CDN.
\ "STANDARD"
/ Archived storage.
3 | Prices are lower, but it needs to be restored first to be accessed.
\ "GLACIER"
storage_class> 2
11. 选择n
Edit advanced config?
y) Yes
n) No (default)
y/n> n
12.会显示所有配置信息 以确认是否添加 输入y
[scaleway]
type = s3
provider = Scaleway
access_key_id = SCxxxxxxxxxxx4S
secret_access_key = d3xxxb-7xxx0-4xx9-axx6-x5xxxxx
region = nl-ams
endpoint = s3.nl-ams.scw.cloud
acl = private
storage_class = STANDARD
--------------------
y) Yes this is OK (default)
e) Edit this remote
d) Delete this remote
y/e/d> y
12.退出q
[/collapse]
进行挂载
输入命令进行挂载操作:
rclone mount scaleway:/ /root/scaleway --copy-links --allow-other --allow-non-empty --umask 000 --daemon
挂载成功,进入看看

6) 配置反向代理进入alist
================
差不多已经安装好了nginx 进宝塔 新建网址 访问alist

新建网站,输入域名
新建完成后 申请ssl
添加反代 http://127.0.0.1:5244

此时访问域名可以直接进入后台了 修改后台密码 添加账号就可以用了
----------
7)安装aria2
---------
参考的[p3terx.com教程][7]
一键命令:
wget -N git.io/aria2.sh && chmod +x aria2.sh && ./aria2.sh
安装完成后 添加CF解析记录 新的二级域名
然后宝塔新建网站
添加刚才的域名
申请ssl
反代 http://127.0.0.1:6800
此时可以连接了
尝试连接看看http://ariang.js.org/#!/settings/rpc/set/https/你的域名/443/jsonrpc/密钥

6) 配置自动上传脚本
参考[https://p3terx.com/archives/offline-download-of-onedrive-gdrive.html][8]
[1]: https://hostloc.com/thread-923631-1-1.html
[2]: https://github.com/kkkyg/CFwarp
[3]: https://alist-doc.nn.ci/docs/install/docker
[4]: https://p3terx.com/archives/rclone-installation-and-configuration-tutorial.html
[5]: https://p3terx.com/archives/offline-download-of-onedrive-gdrive.html
[6]: https://console.scaleway.com/project/credentials
[7]: https://p3terx.com/archives/offline-download-of-onedrive-gdrive.html
[8]: https://p3terx.com/archives/offline-download-of-onedrive-gdrive.html


Comments | NOTHING
Warning: Invalid argument supplied for foreach() in /www/wwwroot/blog.lw.al/wp-content/themes/Sakura/functions.php on line 1093